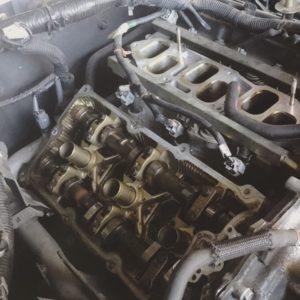
I’m really glad to be doing this job. I have been smelling this nasty burning oil smell for months now and I’m ready for it to be done. Not only does it smell bad but burning oil isn’t exactly good for your health to be breathing it in and its certainly not earth friendly. The lion share of work is just getting to the covers, actually swapping out the gaskets is really not that big of a deal.  The most important thing to watch for on this job is to be sure not to drop any shit onto the cams when removing the cover and cleaning the mating surfaces.
When I did the video I performed the job on the passenger side. On the driver side the only thing that you need to look out for is the main fuel line that leads to the rails on the intake manifold. Other than that the job is just about the same. There are a few additional connectors on the driver side including the O2 sensor wire leading to the exhaust. On a positive note you do not need to remove the Cam Positioning Actuator on the driver side so it just one less thing to deal with (however you should still unplug it).
Now lets talk torque spec and order. I know in the video I talk about the specs and order of the bolts on the valve cover and the throttle body but I want to include a few more.
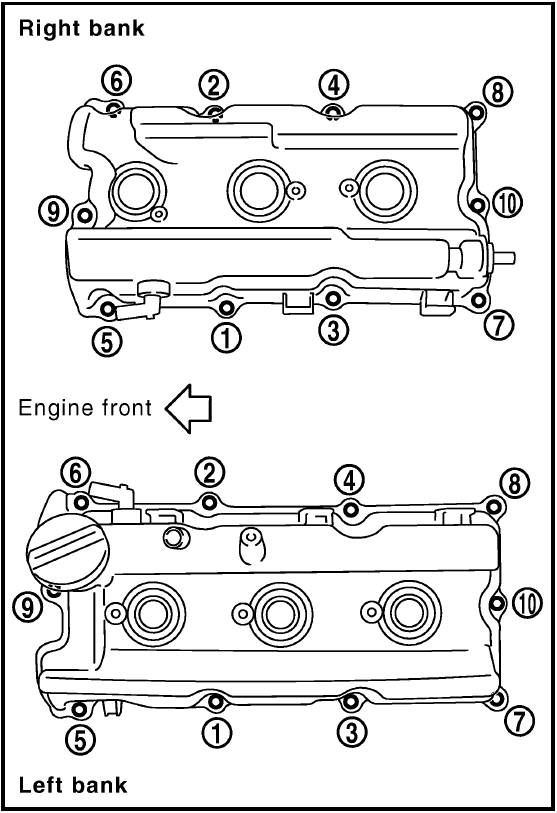
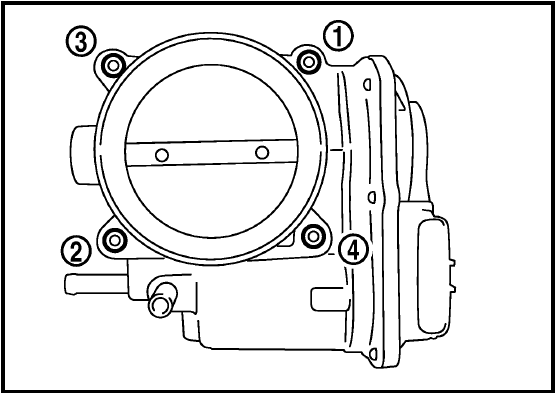
As a refresher here are the order and the specs for the valve cover and the throttle body:
2 Rounds of torque. One round at 17 in-lbs and the second at 74 in-lbs
-These are all 10mm bolts
These are a single round at 74 in-lbs
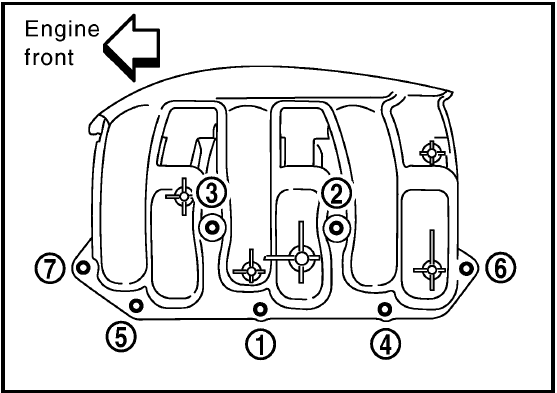
What I don’t mention in the video is the intake collector bolts/nuts and what the order and spec are for those. So here ya go!
The nuts and the bolts for the collector go in at 8 ft-lbs in the following order
Other than that the job is literally just reassembling it the way it came apart. When you are you reassembling be damn sure that you are not forgetting to plug anything back in! You will be kicking yourself if you removed a fuel injector plug under that intake collector and have to remove it all to plug one little thing back in.
Let me know how it goes for you! Mine actually looked good but was still leaking for some reason. Other people have said that the actual gasket had completely split into pieces. Comment below with some photos of where your leak was coming from. Talk to ya soon!
-Ry
This post references the Ry The Car Guy video below
If you are looking for the gaskets I used in the video they are here: http://amzn.to/2xAL1Vk and here is the gasket maker I used as well: http://amzn.to/2ftWNdW
Tools I used on the job:
10mm Socket
10mm Socket (deep well)
12mm Socket
Extenders
Flat head screw driver
Needle Nose Pliers
Gasket Scraper/ Razor Blade
Gaskets and RTV as mentioned above


