
As I stated in my video I wanted to get this post out as supplemental resource for anyone that is doing this job. It is meant to supplement the video and not replace it. If you have any questions please feel free to reach out to me.
This is just for the clutch portion of the job. If you want to see the post about removing the transmission please click here.
I will assume in this article that you want to replace everything that is reasonably accessible when removing the transmission. This would be the following items:
- Rear main seal
- Pilot bushing
- Flywheel
- Clutch
- Clutch Cover
- Throw-out/Release bearing
Lets start with the big stuff. Replacing the flywheel, clutch, and clutch cover is rather simple. You need to unbolt all the stuff and then bolt it back on. Really, its that easy. The only items to keep in mind are some of the tools you will need to do the job, the timed flywheel, and making damn sure to not get your clutch contaminated with grease/oil. As far as the tools are concerned you will of course need your standard array of automotive tools in addition to a few “specialty” or uncommon tools. First off you should pick up a flywheel turner. This allows you to hold the flywheel in place when taking off or installing bolts. Additionally you will need a TP55. This is a Torx Plus 55. IT IS DIFFERENT FORM A T55 AND YOU SHOULD NOT USE A T55. This will be used to remove and install the flywheel bolts. next are a three jaw puller and bearing presses to replace the release bearing. If you do not plan to use these a lot you rent these from auto parts stores. You can also find all these these tools on amazon using the links below (affiliate links). Lastly you need some sort of tool to install the rear main seal. The Nissan tool is like $120 so I went to the hardware store and got a 3″ PVC adapter and and cleanout drain cap to create my own press, 7 bucks total.
TP55 Bit: https://amzn.to/3u5AgEU
Flywheel Turner/Holder: https://amzn.to/3rCN0RQ
3 Jaw puller: https://amzn.to/31KqPyk
Bearing press: https://amzn.to/39ByymY
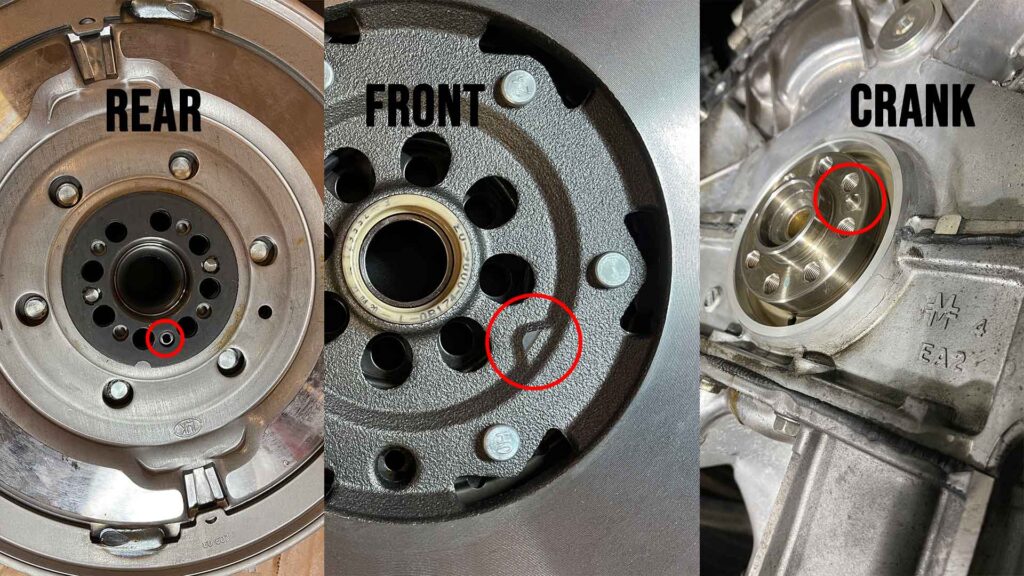
When re/installing the flywheel you need to be damn sure you are putting it on correctly. The crank position sensor uses the ring on the rear of the flywheel to see what position the crank is in (stupid, I know). However they do provide you a notch in the front of the flywheel that needs to be aligned with the dowel on the crank. See below.
The manual did not indicate a particular patter in which the bolts should be installed so I just went with a standard star patterns and dabbed the bolts with some Loctite to keep them nice and snug. torque those down to 65ft-lb (88N.m/9kg-m).
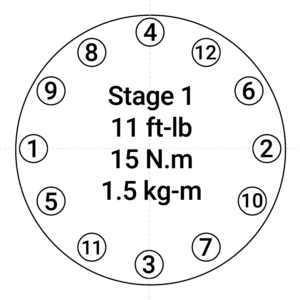
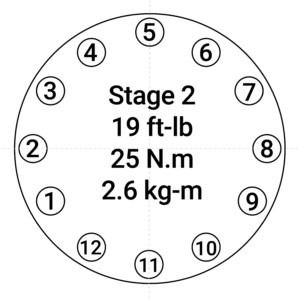
The clutch cover/Pressure plate is a different story. This needs to be bolted down in the correct pattern. I also bought new bolts (manual does not say to) for this part of the job since they are on the small side and have lock washers. When you are ready carefully insert the clutch using the clutch alignment tool (should come with your clutch kit). Align the dowels and press it on to hold it there. When you are ready tighten the bolts in two phases and in the following patterns.
Once you have those worked out you need to get the the rest of the vehicle put back together.
For the most part its as simple as bolting everything back up and driving off into the sunset. I will just go through some tips I learned as I went through the process.
Mounting the transmission
Right off the bat I want to say you should really have a second person for this. I tried like hell to get this thing to meet up on my own and I could not do it. Once I had a second person I had the thing slide in place in under 5 minutes. You need to have someone on the back of the jack controlling the height of the rear of the transmission. This allows you to be up front guiding the input shaft through the clutch and tell the person in the rear to go up or down to line it all up. Once you get it to meet up with the engine torque the mount bolts down to 55ft-lb. There are 10 in total.
Refilling the transmission
Once you get the transmission mounted back up you will need to refill it with fluid. You cannot throw any old tranny fluid in there. You need have a specific fluid. Below is what the Manual says you will need:
Genuine Nissan MTF (manual transmission fluid) HQ multi 75w-85 or API GL-4, viscosity of SAE 75w-85 or 75w-90
2WD will take 4 and 1/4 quarts and 4WD will take 4 and 3/8 quarts. Tighten the fill and drain plugs down to 25ft-lb
Exhaust install
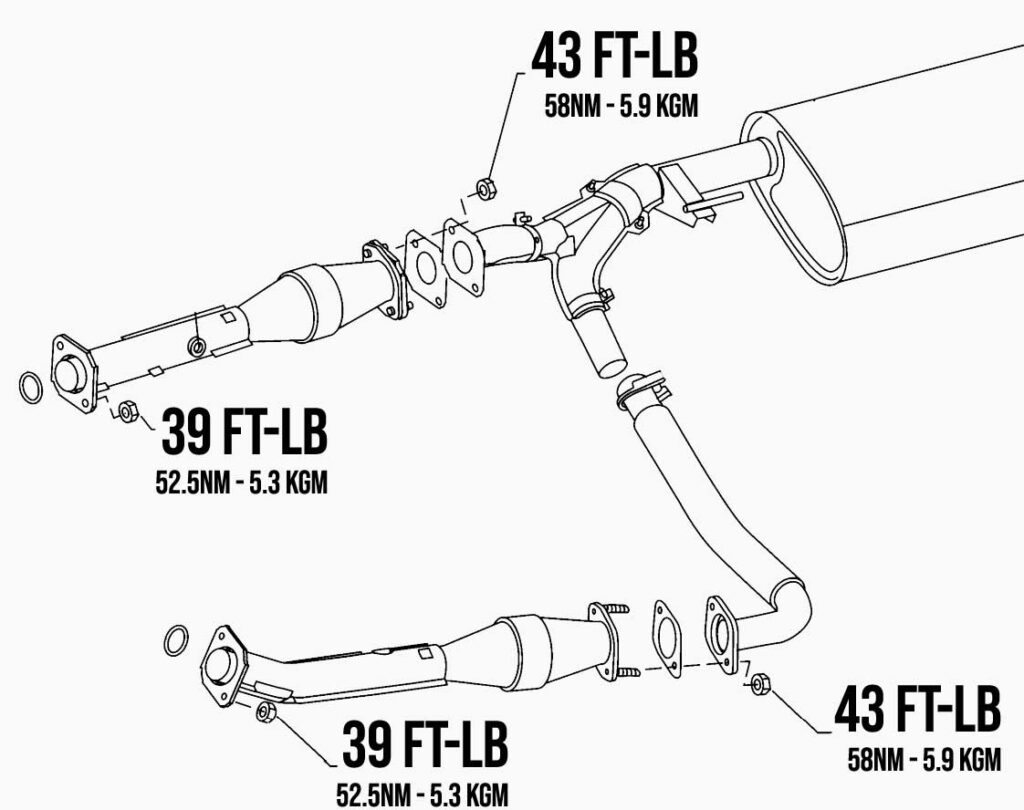
Nothing really to say here, just line up the studs on both sides of the exhaust pipes and tighten them to spec. You should replace any gaskets that you remove. Dont forget to plug your O2 sensors back in and install both sides loosely before tightening it all down. Once you get the exhaust put back together make sure that you dont over torque the heat shield bolts. They go down to only 51 in-lbs.
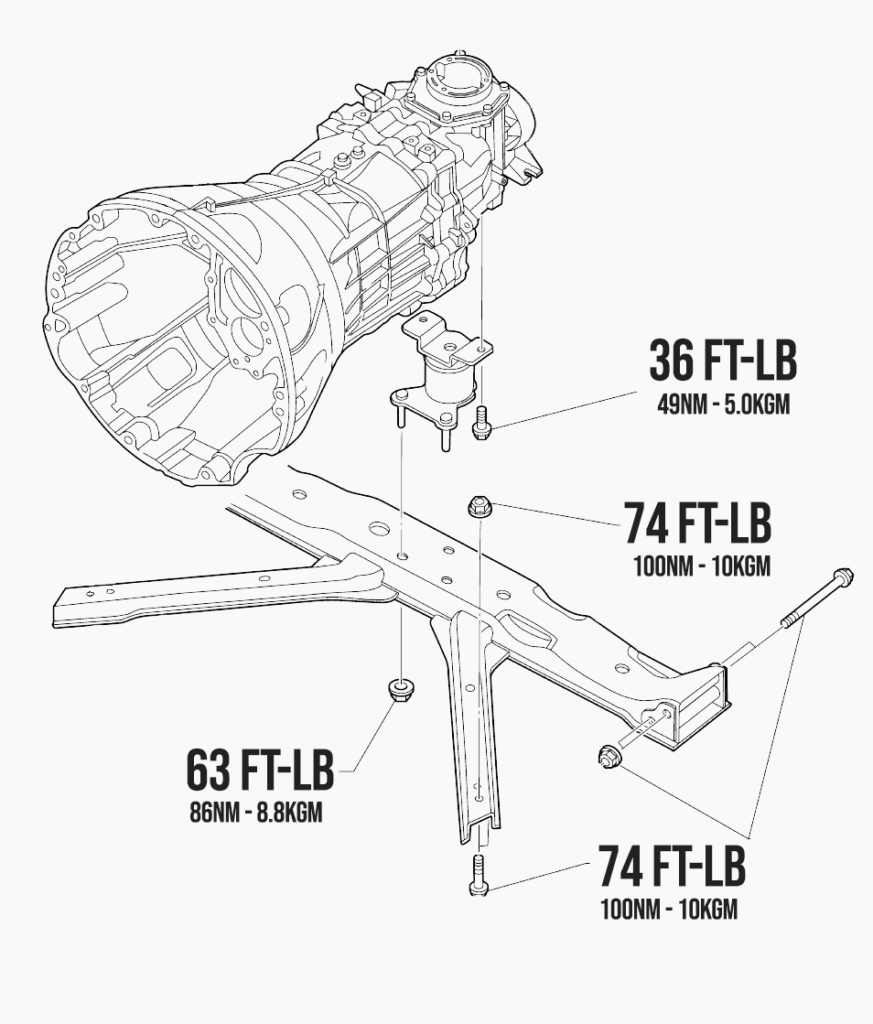
Installing the rear cross member
Just getting this out what a huge pain. When you are reinstalling it make sure you clean the surface of the cross member that slides into the frame mount as well as clean the surface of the mounts themselves. I used a scour pad to take off any flake rust and smooth it over as well as I can. I also used chassis lube to make inserting it a little easier. I put it back into the X one side at a time. I lined up the bolt holes and had a friend hammer it up into place until the hole was aligned. He then slide the bolt in and then I used a combination of a hammer and a floor jack to get the other side in. Torque all bolts/nuts (8 in total) down to 74 ft-lb
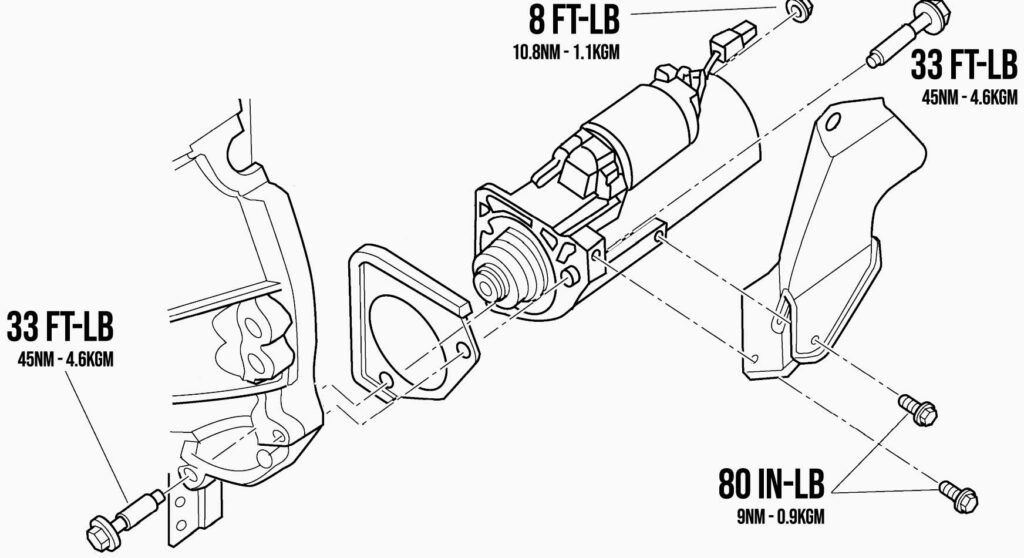
INSTALLING THE starter
Nothing special here. Just slap it back in and make sure to not over torque the nut on the post. Don’t want to damage the starter.
As far as the rest is concerned just bolt it back together and have fun! If you want to watch the video for this process you can find it below. Thanks for reading!