To be honest this job was really straight forward. There is really not much to write up so below you will find the specs for the parts of the vechiles that are touched during this job. This page is broken up into two parts. The Titan/Armada/QX56 first, then below that the Xterra/Frontier specs. Scroll to the very bottom to quickly access the video. Thanks for stopping by!
As I stated in my video I wanted to get this post out as supplemental resource for anyone that is doing this job. It is meant to supplement the video and not replace it. If you have any questions please feel free to reach out to me.
This is just for the clutch portion of the job. If you want to see the post about removing the transmission please click here.
I will assume in this article that you want to replace everything that is reasonably accessible when removing the transmission. This would be the following items:
Rear main seal
Pilot bushing
Flywheel
Clutch
Clutch Cover
Throw-out/Release bearing
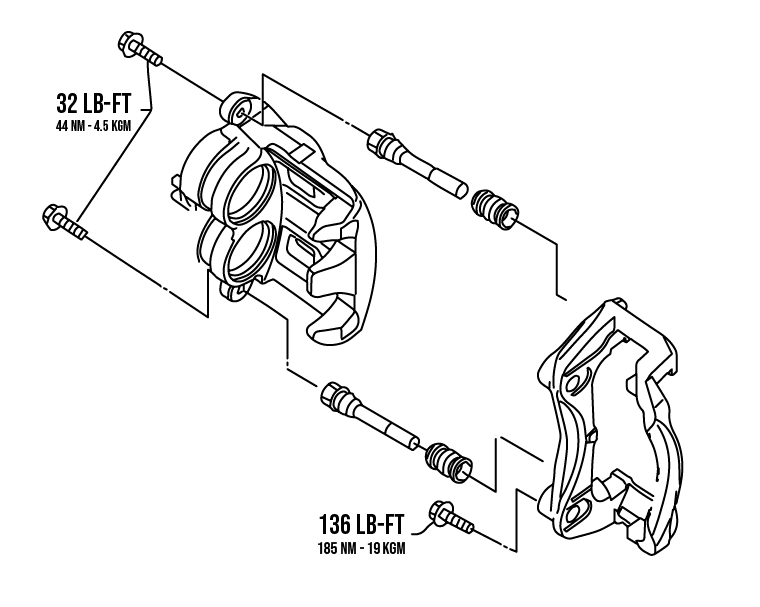
Lets start with the big stuff. Replacing the flywheel, clutch, and clutch cover is rather simple. You need to unbolt all the stuff and then bolt it back on. Really, its that easy. The only items to keep in mind are some of the tools you will need to do the job, the timed flywheel, and making damn sure to not get your clutch contaminated with grease/oil. As far as the tools are concerned you will of course need your standard array of automotive tools in addition to a few “specialty” or uncommon tools. First off you should pick up a flywheel turner. This allows you to hold the flywheel in place when taking off or installing bolts. Additionally you will need a TP55. This is a Torx Plus 55. IT IS DIFFERENT FORM A T55 AND YOU SHOULD NOT USE A T55. This will be used to remove and install the flywheel bolts. next are a three jaw puller and bearing presses to replace the release bearing. If you do not plan to use these a lot you rent these from auto parts stores. You can also find all these these tools on amazon using the links below (affiliate links). Lastly you need some sort of tool to install the rear main seal. The Nissan tool is like $120 so I went to the hardware store and got a 3″ PVC adapter and and cleanout drain cap to create my own press, 7 bucks total.
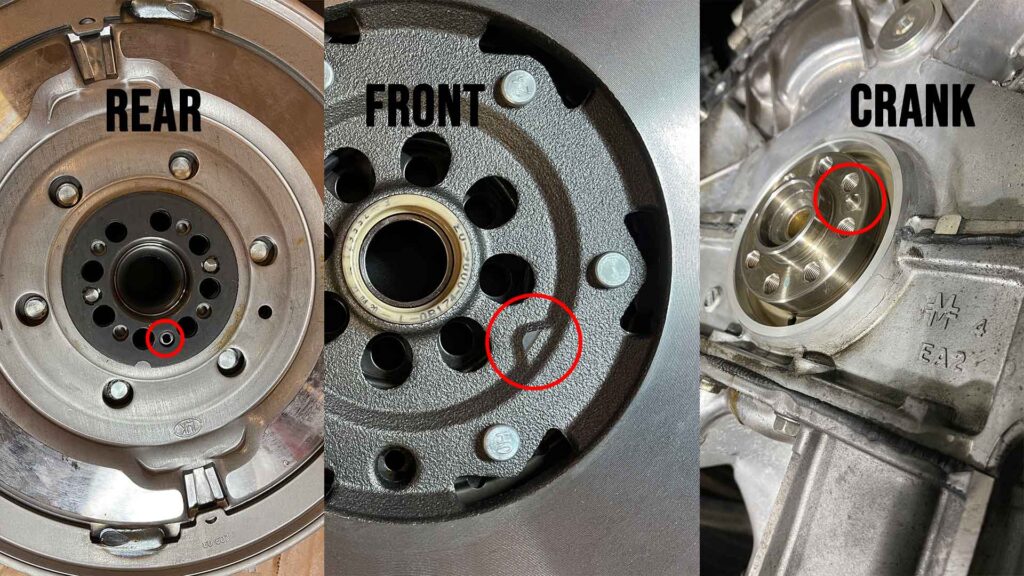
When re/installing the flywheel you need to be damn sure you are putting it on correctly. The crank position sensor uses the ring on the rear of the flywheel to see what position the crank is in (stupid, I know). However they do provide you a notch in the front of the flywheel that needs to be aligned with the dowel on the crank. See below.
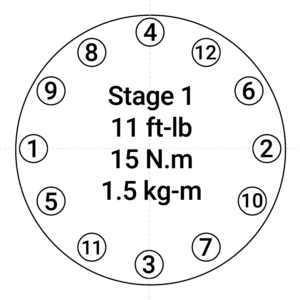
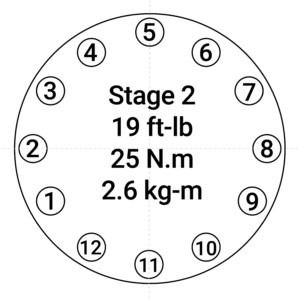
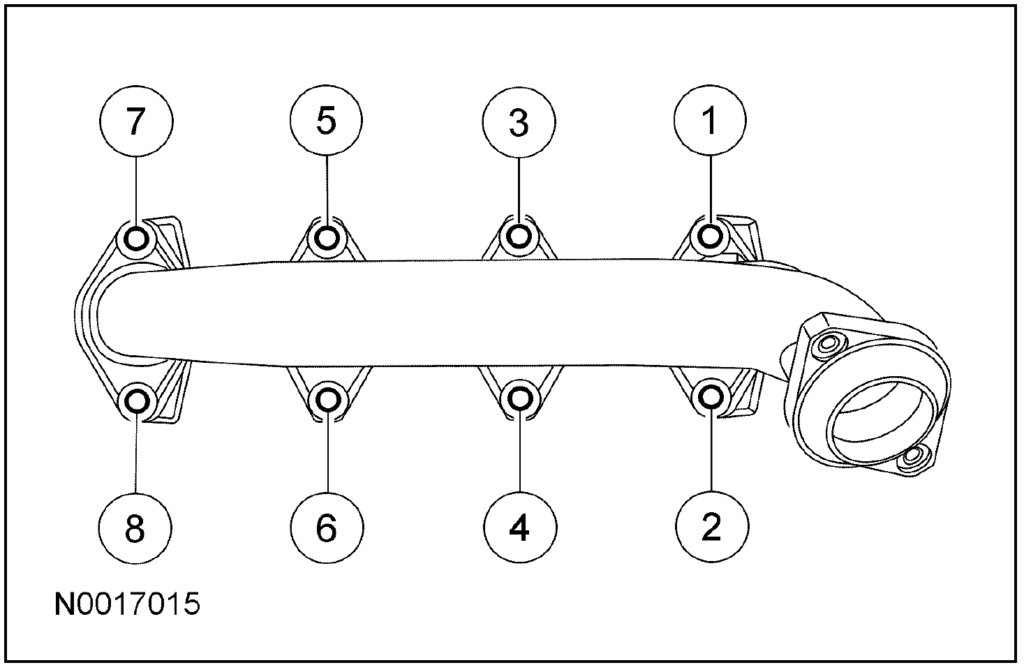
The manual did not indicate a particular patter in which the bolts should be installed so I just went with a standard star patterns and dabbed the bolts with some Loctite to keep them nice and snug. torque those down to 65ft-lb (88N.m/9kg-m).
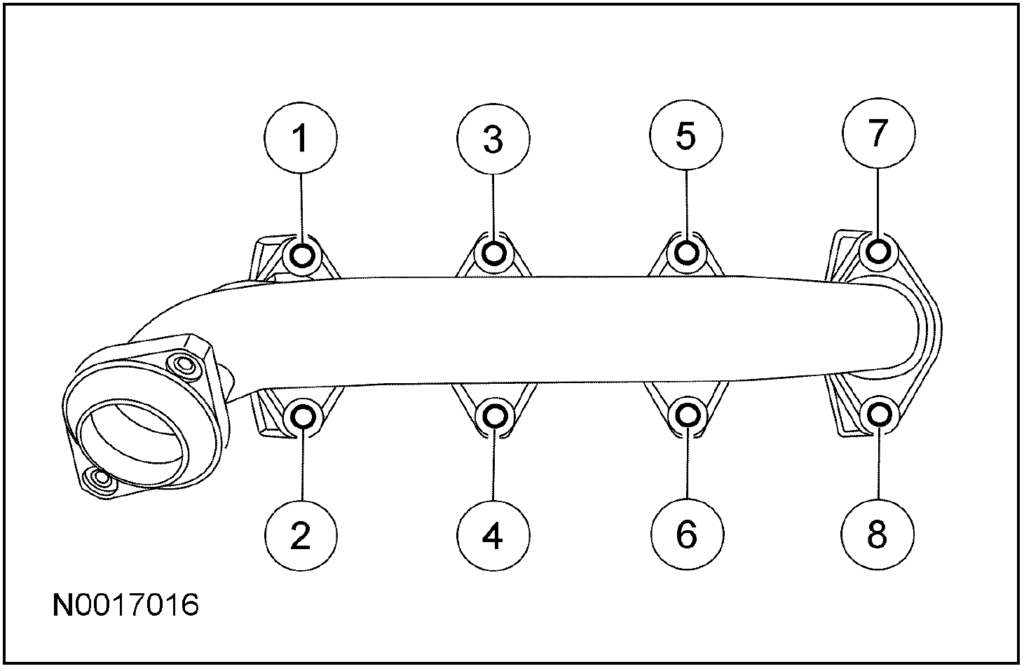
The clutch cover/Pressure plate is a different story. This needs to be bolted down in the correct pattern. I also bought new bolts (manual does not say to) for this part of the job since they are on the small side and have lock washers. When you are ready carefully insert the clutch using the clutch alignment tool (should come with your clutch kit). Align the dowels and press it on to hold it there. When you are ready tighten the bolts in two phases and in the following patterns.
Once you have those worked out you need to get the the rest of the vehicle put back together.
For the most part its as simple as bolting everything back up and driving off into the sunset. I will just go through some tips I learned as I went through the process.
Mounting the transmission
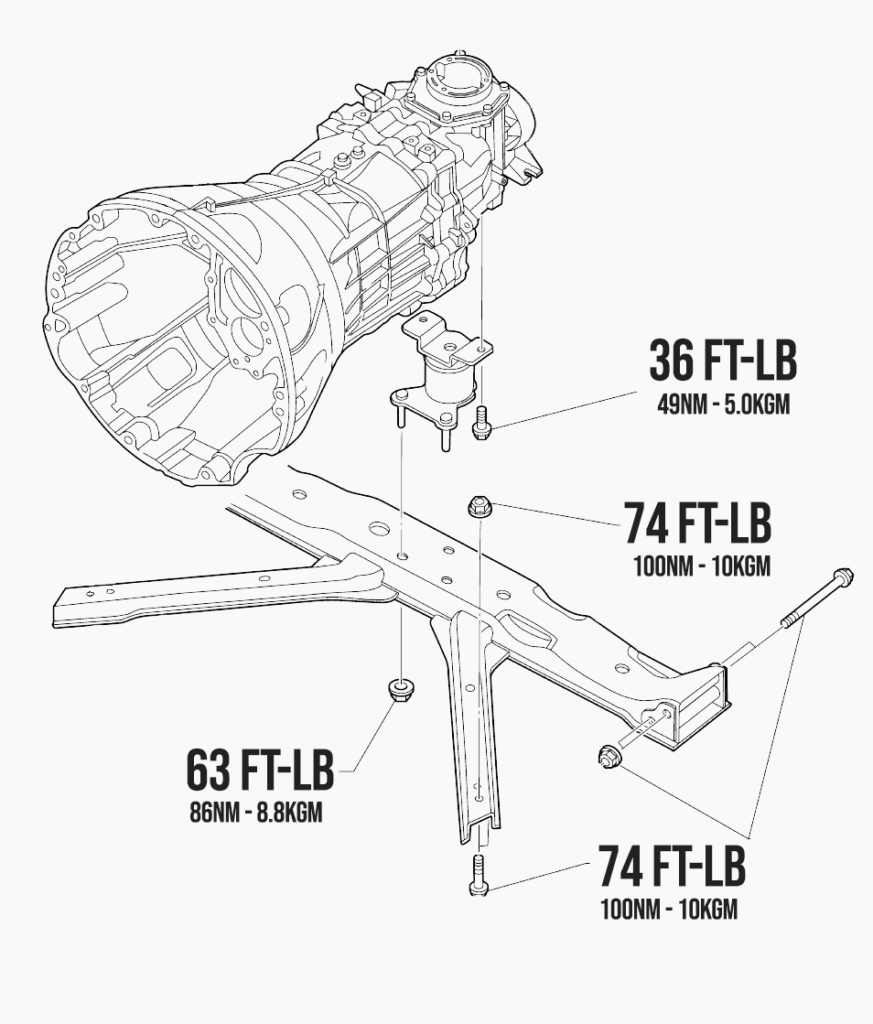
Right off the bat I want to say you should really have a second person for this. I tried like hell to get this thing to meet up on my own and I could not do it. Once I had a second person I had the thing slide in place in under 5 minutes. You need to have someone on the back of the jack controlling the height of the rear of the transmission. This allows you to be up front guiding the input shaft through the clutch and tell the person in the rear to go up or down to line it all up. Once you get it to meet up with the engine torque the mount bolts down to 55ft-lb. There are 10 in total.
Refilling the transmission
Once you get the transmission mounted back up you will need to refill it with fluid. You cannot throw any old tranny fluid in there. You need have a specific fluid. Below is what the Manual says you will need:
Genuine Nissan MTF (manual transmission fluid) HQ multi 75w-85 or API GL-4, viscosity of SAE 75w-85 or 75w-90
2WD will take 4 and 1/4 quarts and 4WD will take 4 and 3/8 quarts. Tighten the fill and drain plugs down to 25ft-lb
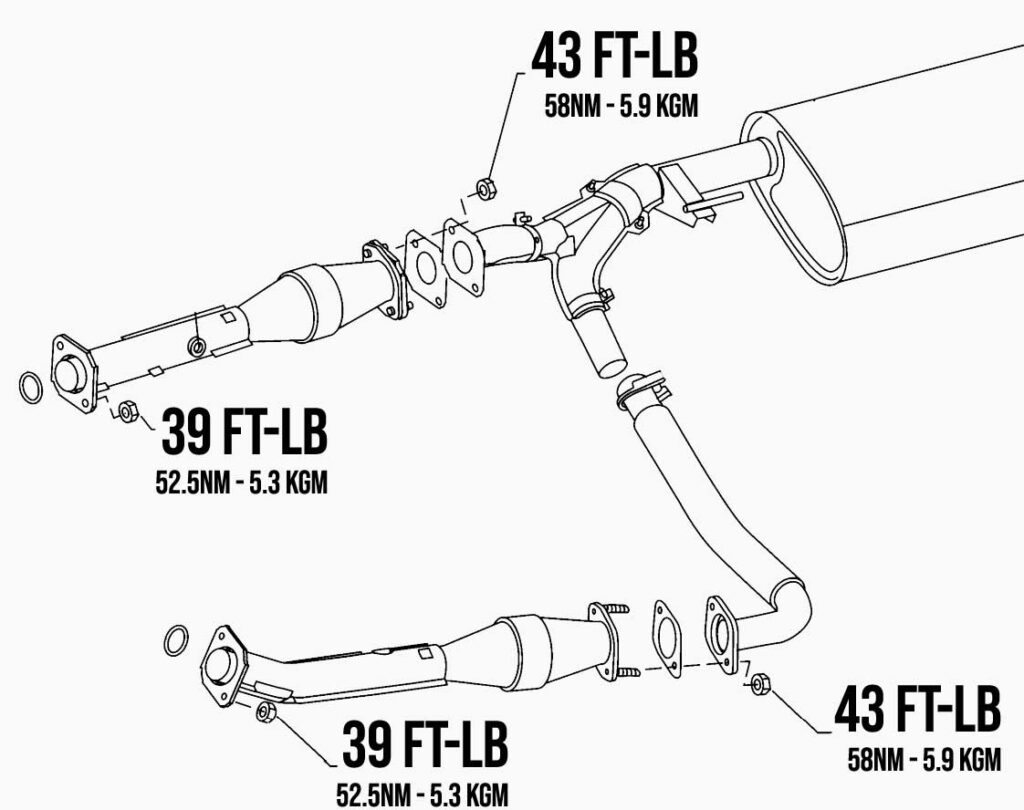
Exhaust install
Nothing really to say here, just line up the studs on both sides of the exhaust pipes and tighten them to spec. You should replace any gaskets that you remove. Dont forget to plug your O2 sensors back in and install both sides loosely before tightening it all down. Once you get the exhaust put back together make sure that you dont over torque the heat shield bolts. They go down to only 51 in-lbs.
Installing the rear cross member
Just getting this out what a huge pain. When you are reinstalling it make sure you clean the surface of the cross member that slides into the frame mount as well as clean the surface of the mounts themselves. I used a scour pad to take off any flake rust and smooth it over as well as I can. I also used chassis lube to make inserting it a little easier. I put it back into the X one side at a time. I lined up the bolt holes and had a friend hammer it up into place until the hole was aligned. He then slide the bolt in and then I used a combination of a hammer and a floor jack to get the other side in. Torque all bolts/nuts (8 in total) down to 74 ft-lb
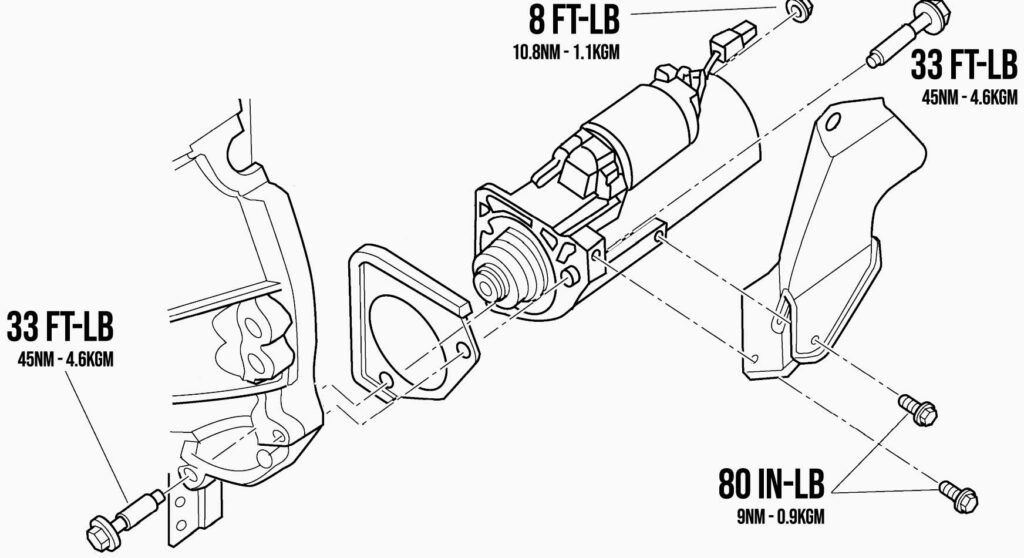
INSTALLING THE starter
Nothing special here. Just slap it back in and make sure to not over torque the nut on the post. Don’t want to damage the starter.
As far as the rest is concerned just bolt it back together and have fun! If you want to watch the video for this process you can find it below. Thanks for reading!
As I stated in my video I wanted to get this post out as supplemental resource for anyone that is doing this job. This article will be broken out into a couple sections. First the steps, then the details of the job.
Here are the complete steps for removal:
Drain transmission fluid.
Disconnect the battery cable from the negative terminal.
Remove the shift lever assembly.
Remove front wheel well protectors.
Remove the crankshaft position sensor.
Remove the undercovers using power tool.
Remove the front crossmember using power tool.
Remove the starter motor.
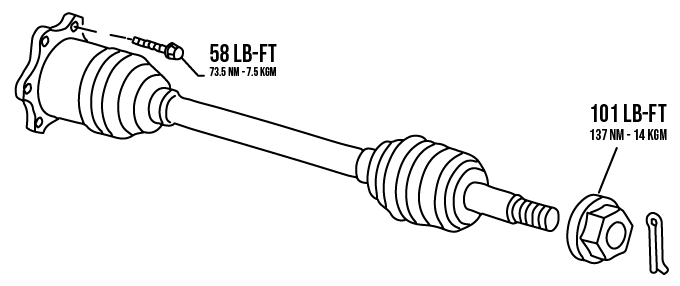
Remove the rear drive shaft. (also remove the front shaft if 4WD)
Remove the left and right front exhaust tubes.
Remove the clutch operating cylinder from the transmission.
Support the transmission using a suitable jack.
Remove the nuts securing the insulator to the crossmember.
Remove the crossmember using power tool.
Tilt the transmission slightly to gain clearance between the body and the transmission, then disconnect the air breather hoses.
Disconnect the following: Back-up lamp switch connector Park/neutral position (PNP) switch connector If you have a 4WD you need to also remove the following: ATP switch connector Neutral 4LO switch connector Wait detection switch connector Transfer control device connector
Remove the wiring harness from the retainers.
Remove the transmission to engine bolts using power tool.
Separate the transmission from the engine and remove it from the vehicle.
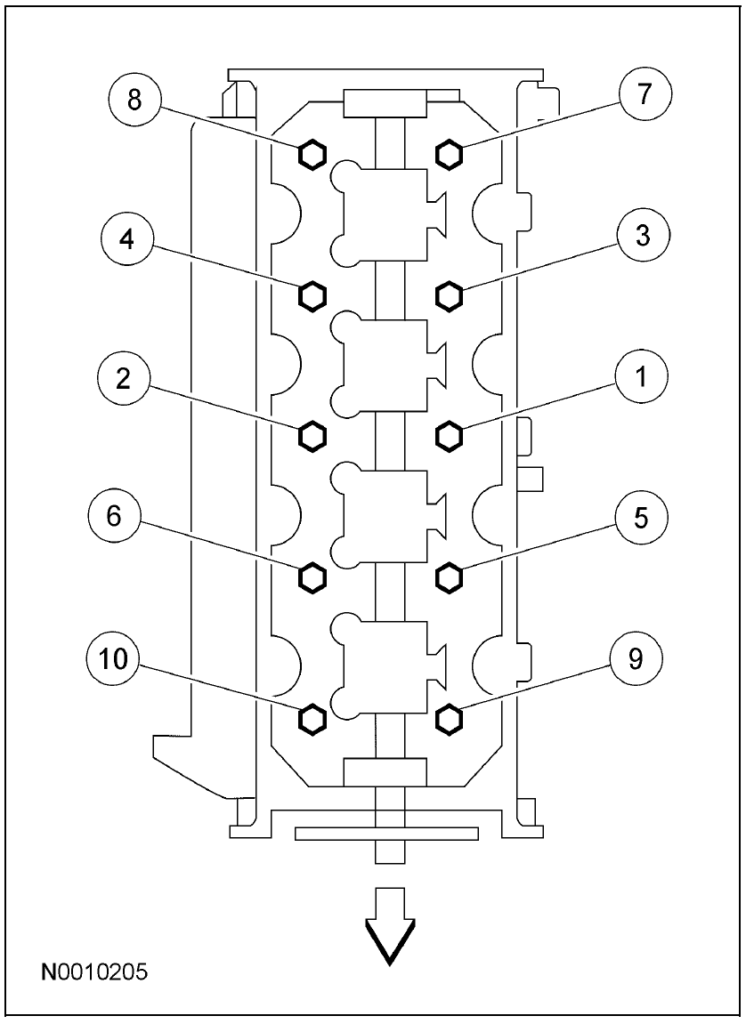
Removing and Replacing the Transmission to engine bolts
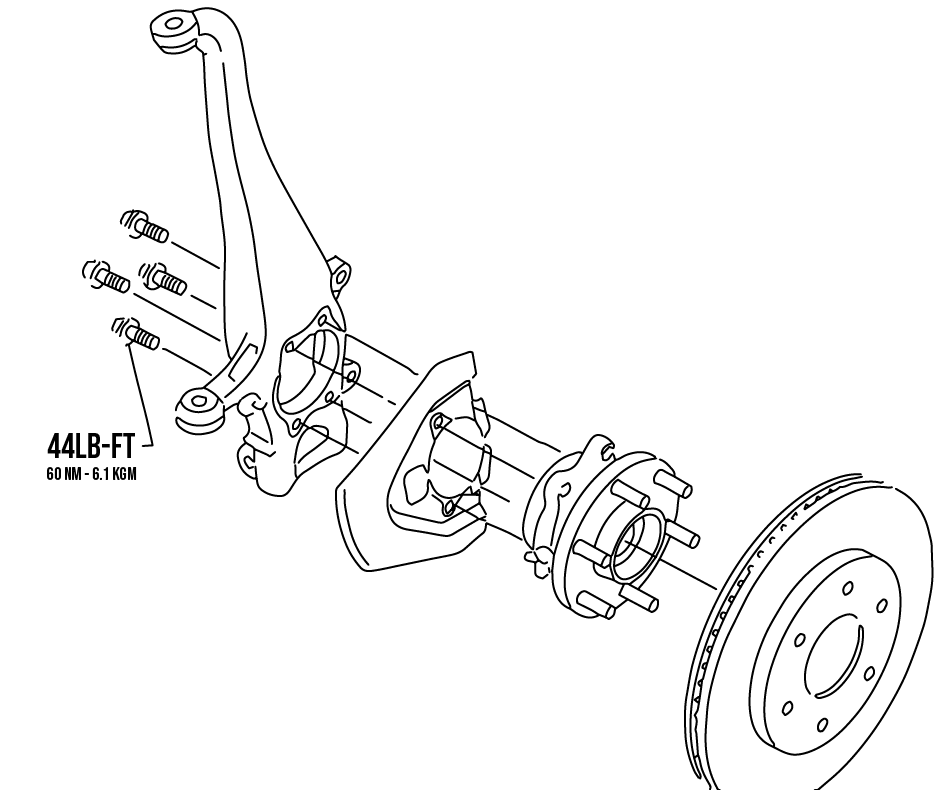
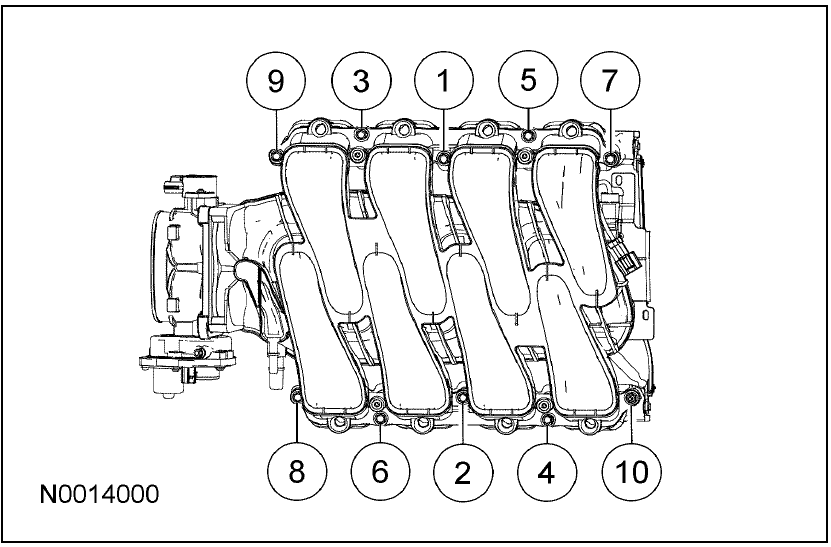
Below are the locations of all of the transmission to engine bolts that must be removed before removing the transmission. When reinstalling you will want to tighten the bolts down to 55ft-lb (7.7 kg-m / 75Nm)
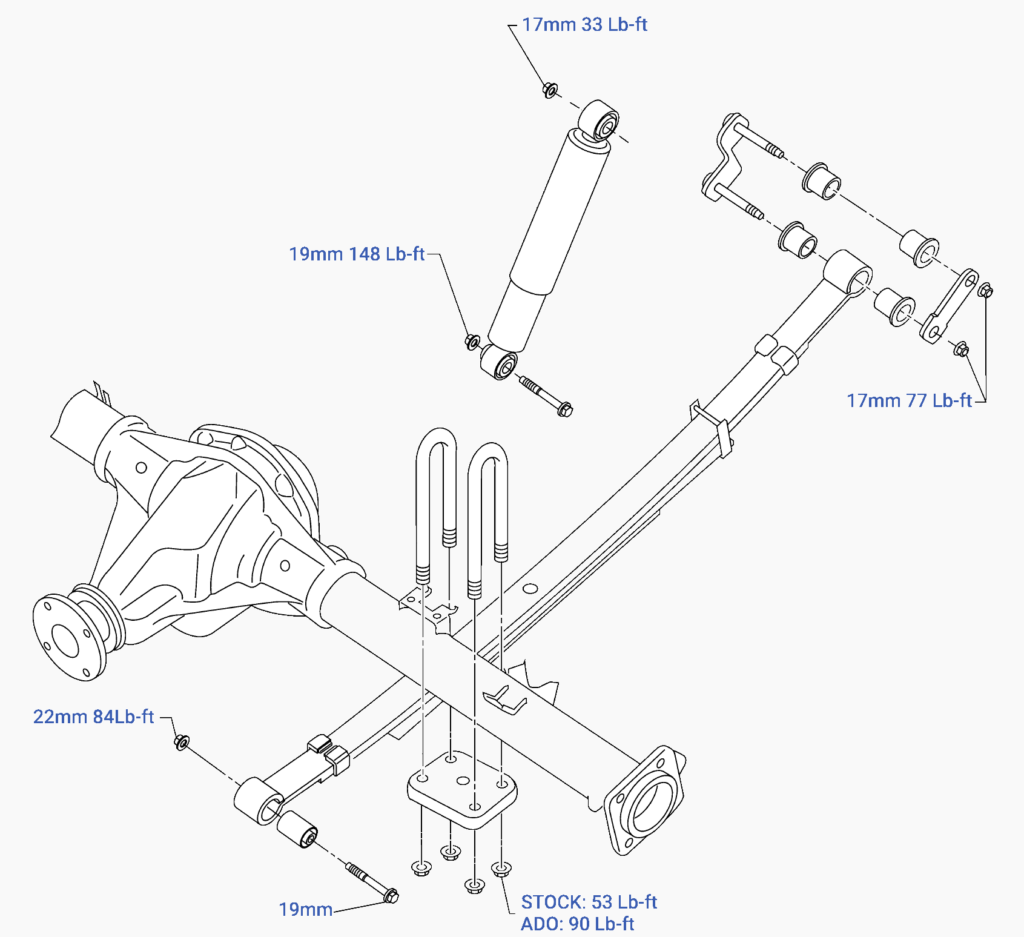
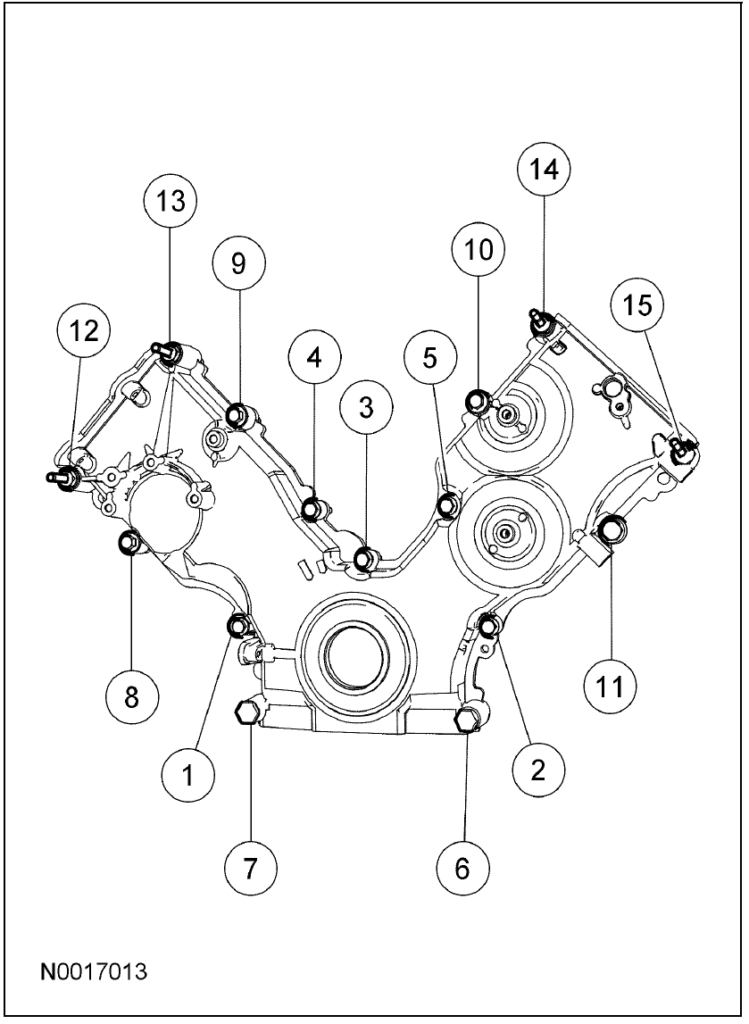
Removing and replacing the rear cross member
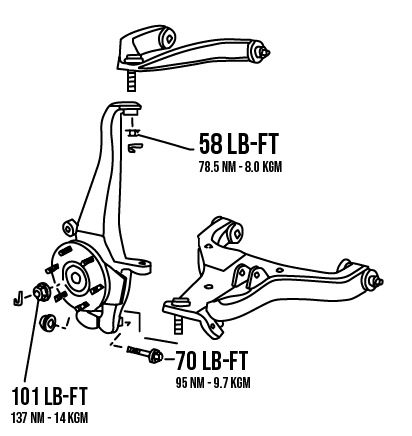
This was a huge pain in the ass. Removing the bolts was easy but this thing was really stuck in there!! See below for the diagram and torque specs for the cross member.
If you are reading this then you likely watched my Nissan Xterra suspension lift kit video over on YouTube. If you have not, then WHY not? Go check it out at the bottom of this page.
This post is designed as a supplement to that video, giving you all the parts, tools, and torque specs to get the job done right. Lets start with a list of tools:
Front End Springs Shocks Cam Bolts If are are going to build the front suspension yourself you will need: Upper strut mounts All rubber mounts and bushings for the front
Rear End Leaf packs Leaf pack bushings shocks Mount Plates (You can drill out and reuse your stock plates if you like)
Below is the notice I received the other day in the mail. This post is referring to a video I recently and you can find that video at the end of this post. Here you go!! Its a downloadable PDF.
I’m back at it again. We seem to have gotten the Mustang bug again (this time a little worse). I have been working on this 06 GT and honestly I really love it. I love the way it drives, the style, the power, I love it all. I do remember loving my first mustang but not like this. I think that while you work on a car and transform it into something that makes it uniquely yours you almost bond with it. You feel a sense of pride in your car that you cannot get my simply writing a check and getting behind the wheel.
I digress, a couple months ago husband purchased a new Ford Fiesta ST and its been a really fun car to drive. Its not all that powerful but it feels far more sporty than it is (probably due to its size). The more we drove it the more power he wanted. He was eyeing a few rides to fill his need for speed, the new Supra, the new mid-engine Corvette, and Camaros. After talking about it I asked that he take a look at Mustangs. We’re very similar people and I really love my mustang so once I got him into a newer S550 is was all over.
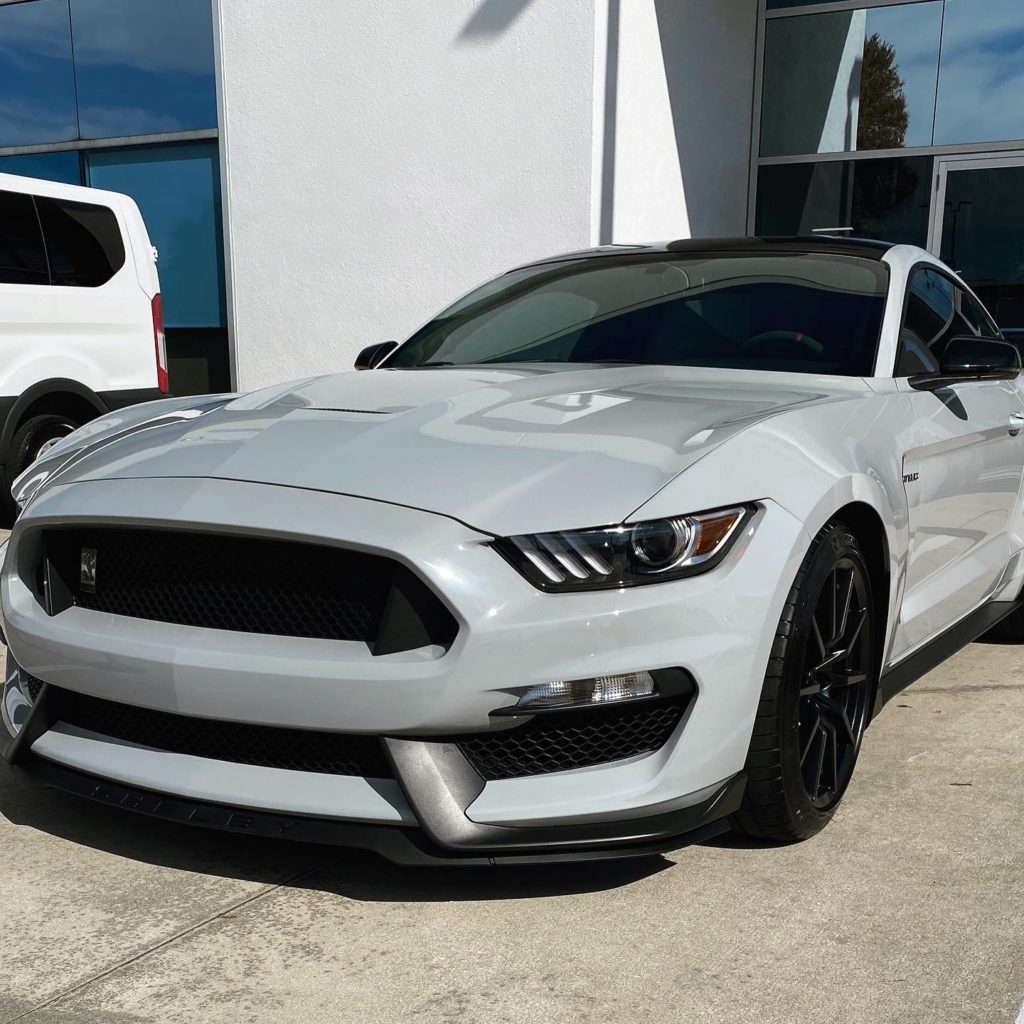
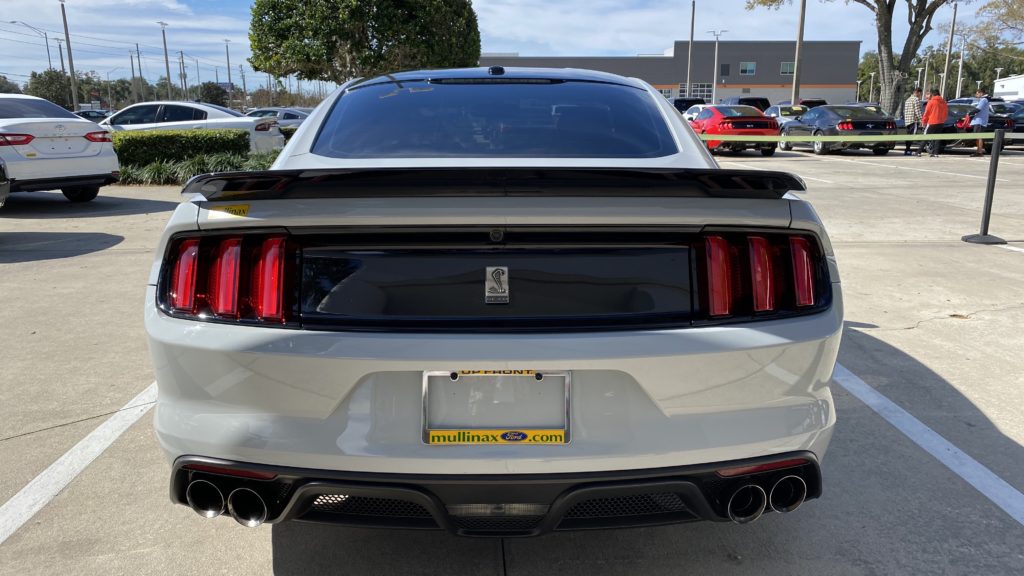
We drove a few GT’s with the performance package but the place we went to had a seriously sick GT350. It was that amazing avalanche matte (but not matte) gray and had low miles. About 1 mile into the test drive I knew he was in love. We talked about it later that night and decided that we had to do it. It didn’t matter that the Fiesta was like 30 days old. We ditched that bitch like a bad date and just 24 hours later we were the proud owners of a 2017 Shelby Cobra GT350. Take a look at the new baby below.
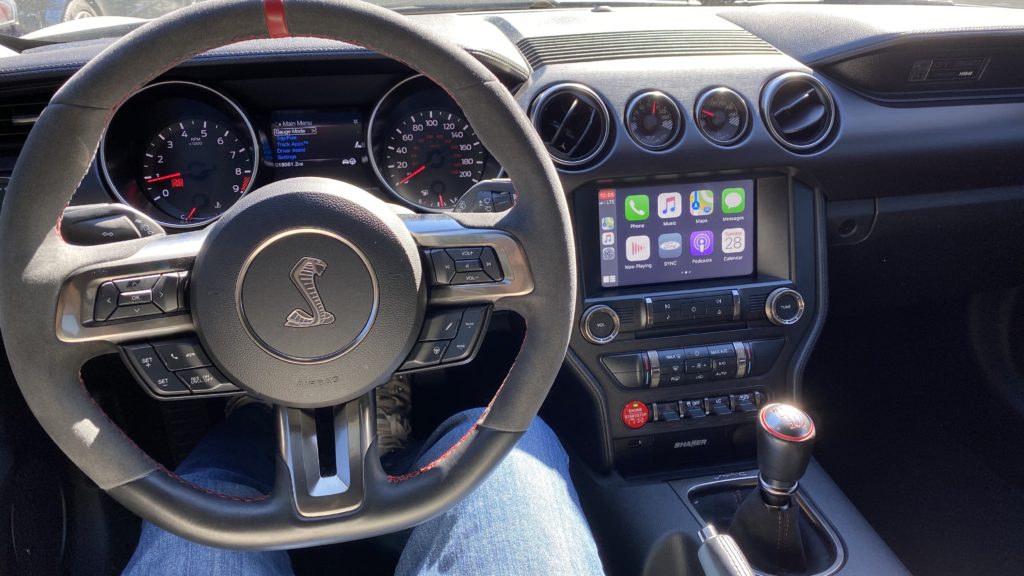
A far as videos are concerned I would not expect much out of this car. He does not want to modify it all that much and everything is pristine on it.
This blog post will act as my running list of all of the torque specs I run across while working on the Mustang. I occasionally forget to mention them in the videos so the idea is that you should be able to come here and find what you need. Also, its just nice to have one consolidated list. I will have it all sorted by part name and the patterns will all be at the bottom of the list.
** Requires specific torque pattern, See diagrams at the bottom of the page.
As of late I walk out into the driveway, look at the X, and just do not see a project truck. I have completed all of the major repairs, created videos on all of the major maintenance items, and made the changes I wanted to make to it. I’m not gearing up to get rid of it or anything but I really am seeing it as a bit of a dried up well.
What this says to me is that its time for another project car…
I have been going back and forth on a few different vehicles but at the end of the day I wanted a car that’s very different from the X. My criteria included:
Sports car Manual/paddle shift transmission Rear wheel drive 2 or 2+2 seating
The rest really doesn’t matter to me. Things like color, whether or not its a convertible, engine size, etc.
Now there are plenty of cars that fit all of those criteria. Rides like the Mazda Miata which is a classic and incredibly popular roadster. The Toyota MR-2 which is (relative to the miata) rare and rather unique looking. The Mustang, Corvette, Camaro, Challenger, BMW’s, Audis, etc…
I got to thinking about all of my options and referenced the list of cars I have already owned. I did this to remember why I hated certain cars/brands and reminisce about the cars I loved to decide if I wanted to relive any of that magic. Going back through that list reminded me of how much I hated my German cars so that immediately helped me eliminate any of those (like the Z4, TT, 3 series, and slk). I have always loved the “domestic muscle cars” so when I got to the Mustang on my list I knew the search was already over. It was cherry a cherry red GT convertible, manual, loud and ridiculous. I remembered how fun it was and how powerful it felt to drive a nice big V8.
That being said I immediately started shopping for my next mustang! I found one that fit the bill and now the fun begins! Take a look at the video below as my introduction to it!
By now you probably think that I am running from the law…..
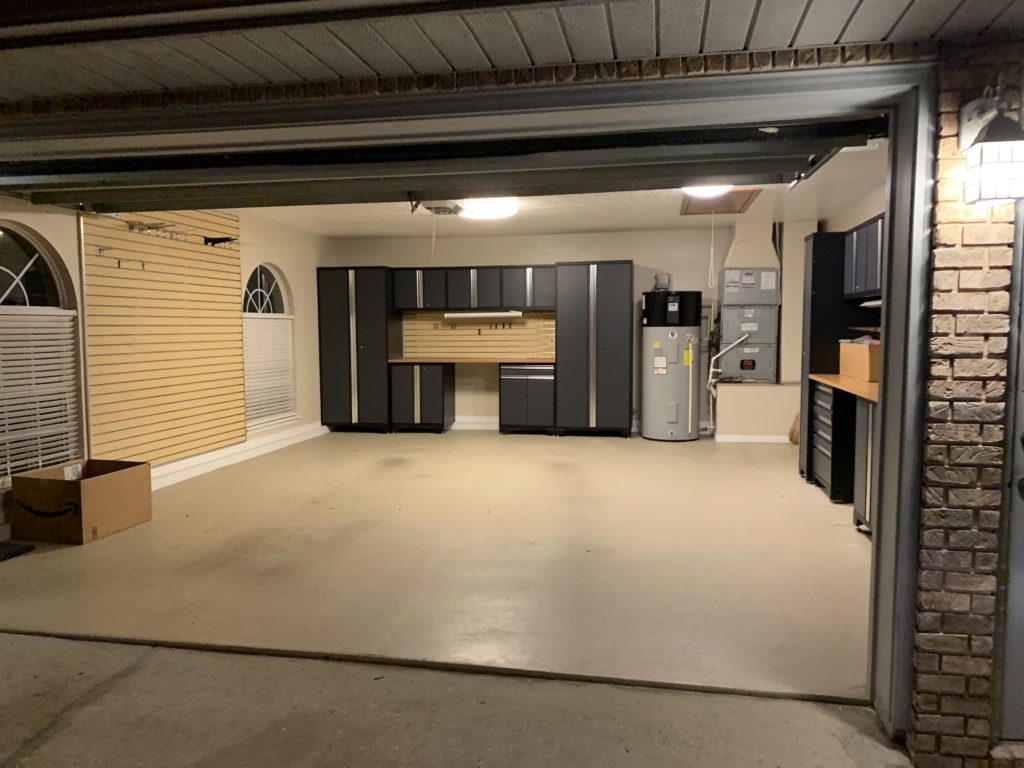
I really do move a lot. I feel like I say this every time but I am hoping to stay here a while. We have relocated to another city in Florida. I’m particularly excited about this move as this place has a really sweet garage. I mean look at it. Slat walls all over the place. TONS of tool storage and plenty of workbench space.
You may have noticed that I have already made a few videos here. Its working out well for the most part other than a particularly noisy water heater.
Anyways that’s all. Just wanted to update you on my latest move and show you newest studio space. Move videos coming soon!!