VVT Soleniods (and regretting past decisions)

Not too long ago I created a video on replacing the valve covers on the Xterra. While I was making that video I was trying to get a nice clear shot of the mating surface between the cover and the top of the motor. To do that I removed the Intake Valve Timing Control Solenoid Valve. What I didn’t realize at the time was that I was creating a huge problem for myself. When I took off the valve I saw that the gasket was in bad shape.

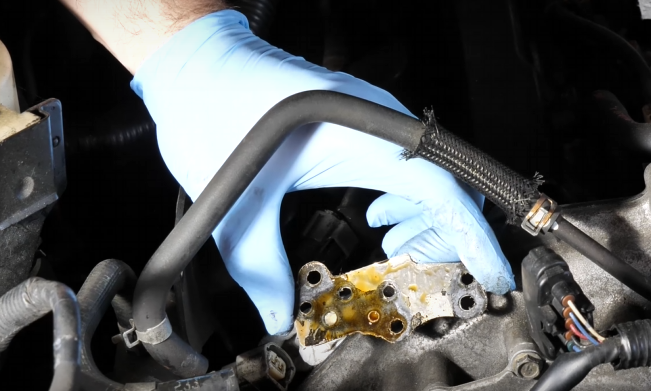
The problem was not that the gasket was bad. It was that I reused it….

Now hear me out, I know that its a cardinal rule to never reuse a gasket (unless they are reusable) but these are not the types of mating surfaces you can quickly throw some gasket maker onto and call it a day. This gasket was small, intricate, and could only be obtained by custom order. So in the moment I had my engine torn apart, cameras and lights all set up, and a video to finish. I decided to cross my fingers and put it back the way it was.

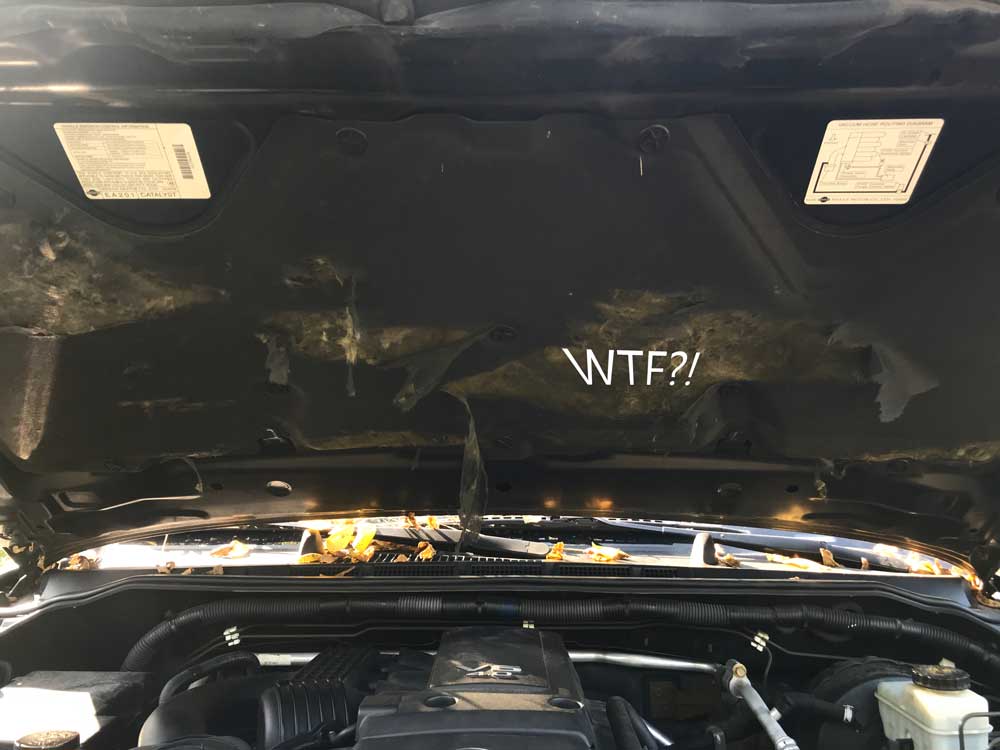
Fast forward a few months, I am driving down the road and I can smell burning oil. I knew almost immediately that my poor decision had caught up with me. I get home, park the X, and see that its smoking!! I quickly open the hood to make sure that its not actually on fire.


I was happy to find that it was just some oil smoking after dropping onto the exhaust manifold, however I knew it was time to stop driving the X and get these gaskets ordered and replaced. I found what part I needed by heading over to https://parts.nissanusa.com and searching for valve solenoid. I found what I needed pretty quickly.

I called Nissan and I determined that they were only $1.31 ! I was pleasantly surprised as I was expecting it to be like 20 bucks.. So I bought a few, just in case since they are the same for both sides anyway..

The job itself was not that big of a deal on the driver side bank. The other side required that I remove the intake manifold which if you have ever done it then you know what a huge pain it can be….

In retrospect its easy to say that I should have just left my car in 50 pieces, ordered the part, waited for it to come in, then replace it when finishing up the other job. However, sometimes we gotta do what we gotta do. But hey, look at the bright side, it was another opportunity to make video for all of you out there!

Thanks for reading.

Adjusting Your Headlights

Sometimes our headlights get out of whack. Whether its because you got into an accident and need to replace the lamp, or maybe you just lean against it too much while drinking beers. Regardless of why, adjusting your headlights is a pretty simple task in the Xterra. The hardest and most important part of this job is ensuring that you set the job up correctly. Here’s what you will need.

  • Your Truck…
  • Some sort of adjustment screen that you will project your lights on. This could be a garage door, a wall, or something you create (like I had to)
  • a long flat area next to your adjustment screen (40ish feet of it)
  • A ratchet to adjust the lamp
  • Tape

When I say you need a flat area I mean it needs to be FLAT. Like completely, utterly, totally level. If you do not have a level surface to place your truck on then you might want to wait until you find a place to perform this adjustment. The reason this is so important is that the adjustment length alone is 25ft. So if you truck is just slightly tilted or on a slope, that tilt or slope will be greatly exaggerated over the distance of the adjustment area. In fact, the manual I am using says you need to fill the gas tank, make sure the fluids are filled to the proper level, tires are inflated, spare tire is in place, ensure there is no additional load in the truck, and that the equivalent weight of the driver is in the drivers seat. Now technically most of these things should already be accomplished. You should always be checking your fluids and tire pressure, and your spare tire should always be in place. I do understand the fuel tank since its in the rear of the truck the difference in weight could make a difference. Anyway, moving on.

Once you have your truck and screen in place, measure the distance between the ground and the actual blub in the lamp. Once you have that measurement you need to mark that same height on your adjustment screen and put the top edge of your tap at that height. When you are ready, turn on your low beams, find your adjustment screws on the back of the lamps and make sure they are at 0 degrees. They will be on the lower portion of the light.

Then, take your ratchet and adjust your beam until the top of the beam is on the top of your tape line on your adjustment screen. This means that for the first 25 feet of your light beam should be exactly level. Here is the layout from the manual.


  • 1 is the wall or screen you are using to project your beam onto
  • 2 is of course the blub in your lamp
  • D is your distance you want to be from your screen which again is 25 ft.
  • C is the point at which the top of your beam should lie on your adjustment screen (the same height as your headlight from the ground)
  • A and B are the variance you can have once you start getting past 25 ft. here are the variances
    • A  Minimum -3.3 mm (-0.13 in) 0.025° up
    • B Maximum 36.6 mm (1.44 in) 0.275° down

As far as the horizontal adjustments I have some bad news. There are none.. If your lamp is shooting light way off to the left or right then there is something wrong with your lamp (or the sub frame it mounts to).

So that’s it! The set up of this job is twice as difficult as the actual adjustment but all in all its pretty easy. Not to beat a dead horse but again just make sure your tuck it LEVEL. That’s the most important part of this job. If everything is level then your adjustments should be good!

One more thing. If you live in an area where they love to regulate every little tiny thing then you might want to refer to local regulations in your area as it pertains to headlights.

Thanks for reading!

These damn animals!

9.22.17
I was cleaning the X the other day and when I opened the hood what did I find? ANIMALS HAVE BEEN TEARING UP MY ENGINE BAY!
Look what those little jerks did? They tore the entire hood liner apart!

How annoying! It looks like I will have a Fast Friday video coming out someday about replacing your hood liner!
Anyone else have intruders in your X? Tell me your story below, and add a pic if you have one!

-Ry


I Found A Leak!!

9.21.2017
For quite a while now when I drive my Xterra everything goes great until it gets nice and hot. Once its hot I can smell this burning scent. The first time that it happened I immediately panicked since I’ve had overheating issues in the past. So I grab my ODB2 reader and everything checks out fine. I have been driving it like this for a while now because if the truck is not overheating then its not that big of a deal (right?).
Well the other day when I was  removing the windshield washer tank I looked deep into the engine bay and I saw it! One of the exhaust heat shields was covered in oil!
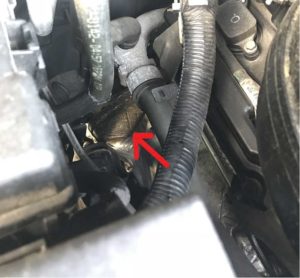
Once that starts happening the oil that is on the heat shield will get crazy hot while driving and create that nasty smell I was smelling. Anyway, I was following the oil up and determined that its coming from the passenger side valve cover.
As annoyed that I was to find out that the X was leaking, I was still very happy to uncover what was going on. I hope to finish the valve cover gasket job this weekend and get the video out within the next few weeks…
In the meantime, check out this Xterra oil change video.

-Ry